See the Products page for info on ALL of my 3D tutorials.
($50 handling)
Available now!
Introducing MODO 901's powerful new features:
NOTE:This tutorial focuses on advanced modeling techniques, for those projects that demand precision and detail. In many ways, it's a "Part Two" for "Modeling with MODO, Volume Six". To make that point, a couple of the descriptive paragraphs below are also included in Volume Six's description. If you haven't purchased Volume Six, I recommend purchasing it along with this volume.
Many new features in MODO 901 will be discussed and demonstrated, but know that the F-22 model (as it exists in June of 2015) was built entirely in MODO 801, so this tutorial is still valid for those of you who are still using that version.
In Volume Six, I showed methods for creating my 2014/2015 version of the Piaggio "Avanti II" P180 aircraft, using Catmull-Clark subdivision surfaces. ("Psubs", in MODO) When areas of the model required edge sharpness, the traditional method of adding additional edge loops was used. In this volume, I show what I consider a more modern method, using edge-weighting, rather than additional edges. This cuts down on the amount of geometry in your file, and also remains more easily-editable in the future, should you decide to make changes. While both methods produce equally high-quality models, the difference in methods is important, and the F-22 "Raptor" model is the perfect subject to illustrate those methods, since it's built entirely with Psubs and edge-weighting.
What's the "best" method?
That's a bit of a trick question. Obviously, the "best" method depends on your output needs. One simple example is that how you create a model may depend on whether you intend to export it to other file formats. One customer may prefer hard polygons, while another prefers sub-d surfaces, or NURBS. So, the focus of this tutorial is to continue on from Volume Six, showing you alternate methods for creating what you need to create, and to do it in a smart way that remains editable in the future.
This model is also extensively rigged for animation, and I'll share a variety of methods for doing this, which you can then apply to your own models.
What if you don't build airplanes?
Aviation/aerospace is obviously my personal interest. But at the macro level, "a model is a model", so understand that all the techniques I show in all of my tutorials are simply model-building methods, and they can certainly be applied to any other project.
Why the emphasis on Psubs? (with or without edge-weighting)
Simply put, any model with a fixed polygon size has a limited shelf life. With today's increasing monitor, TV, and movie resolutions, it would be helpful to have models that are more future-proof. If you build a model entirely with Catmull-Clark surfaces, ("Psubs", in MODO) you can increase the resolution at any point in the future by simply increasing the subdivision level. This holds true, even if you're exporting hard-poly models, since you can take the same step before freezing the model.
Some of my favorite fellow artists have created step-by-step tutorials, in which you build a particular model, just as they built it. Clearly, some people like that approach. But when I watch these, I never build the model shown. Instead, I try to learn the methods, and apply them to my own work. So, as with all my previous tutorials, this one is aimed at showing you the methods and the results, but is not a "step-by-step" tutorial that ends up with you having built the same model I did. That's not the point. Learning the "how" is much more important than the "what", and so while several files are included for you to use, the F-22 model itself is not. (But, there is a special price available. exclusively for MODO users who purchase this tutorial.) The methods shown in this tutorial can be applied to any modeling task, so have fun with it, and go in your own direction.
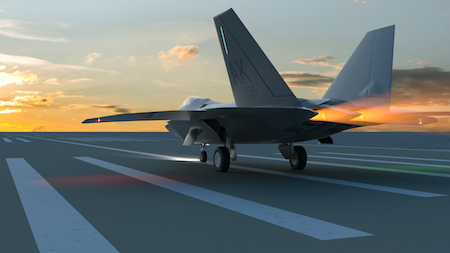
Preview movies from the F-22 Project:
NOTE: Most movies contained in the actual tutorial are 1280 X 720, with sound. A few of them are 1920 X 1080, for extra clarity.
Click here to view a video on the current state of the model, including it's rigging, and how I've setup the start of the interior structures.
Click here to view a video on creating the stealthy sawtooth-edged panels on the Raptor's surface.
A little thank you to Rich Hurrey for his updated version of the Rigging Master Course (with music)
How to find and fix the problem when edge-weighting doesn't work the way you expected.
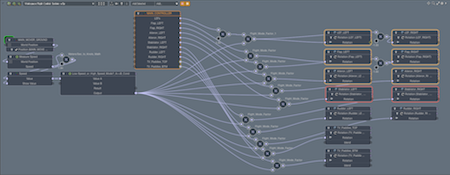
Here are some of the rigging subjects discussed in the tutorial. (There's MUCH more!)
Here's a demo of using weight containers to bend the wings of an airliner model.
General subjects discussed and explained:
- An introduction to some of MODO 901's new features and capabilites
- Why Psubs with edge-weighting are probably the most versatile and future-proof method of modeling in MODO
- What is "zero"? (Good advanced planning reduces errors in a precision-scale model later.)
- An "order of operations" for modeling, to help you with precision, when your documentation is lacking
- Extensive text, images, and video regarding the construction of the F-22 "Raptor" model. (All Psubs, with edge-weighting)
- Work smart! - Balancing advanced techniques with complexity and time allowed
- Various reasons to use edge-weighting, as opposed to adding additional geometry
- Selection Sets - Far more than just an organizational tool
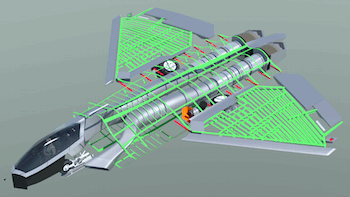 The smart way to create internal structures in your model.
- Why retopologizing parts is often handy, especially for rigging and animation.
- Why it's so important to meticulously save previously-used parts
- "Wrappers" for rigging, to allow multiple functions from the same geometry and rig
- Using "organic" tools to improve hard-surface topology.
- Converting "regular" sub-d parts to Psubs, and why this can be helpful
- How animation rigs for something like an aircraft are different from other types.
- Tips for keeping your animation rig controls organized
Rigging-specific tutorials
Thanks to lessons learned from Rich Hurrey's "Rigging Master Course", we'll spend some time on more complex rigging and animation examples, expanding far beyond simple control functions.
- How to create your own logic "switches" to control aspects of your rig, under various conditions (like some of the examples below)
- How to rig a "Speed Meter" to see how fast your model is moving. (on the ground or in the air)
- How to problem-solve a fully-functional landing gear setup where the tires rotate when on the ground, then stop when off the ground, the tires squish and bulge on contact with the ground, the suspension works, nose gear is steerable, and more. The landing gear rig file is included in the tutorial, so you can explore it, and possibly adapt it to your own projects.
- How to rig a modern flight control system (like the F-22) so that when stopped, or at slow speed, the control surfaces deflect fully, then gradually the deflection decreases as the aircraft accelerates.
- How to rig "overrides" and "lockouts" for some functions, depending on the conditions. (for example, disabling the thrust-vectoring nozzles when the landing gear is down, at certain speeds)
- How to "pre-rig" certain functions in your model, and use the "Dissolve" channel as a switch
Note: The animation lessons here are directed toward the kind of hard-surface movements you'd expect aircraft and other real-world vehicles to do, and is not a character-rigging type of tutorial.
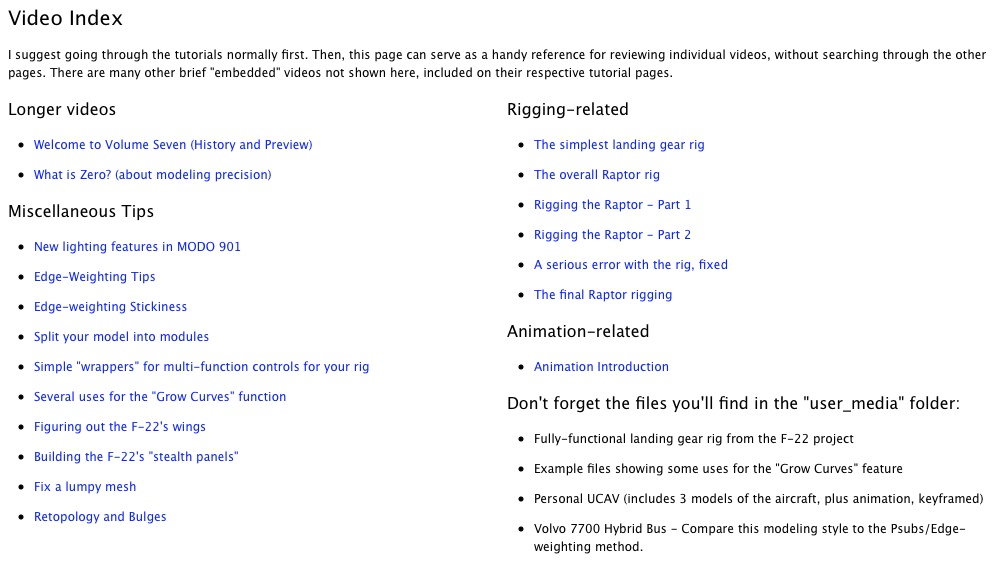
Some of the videos included: (This is a screen capture of the Video Index page.)
This tutorial set includes 19 HTML pages of text-based articles including approximately 100 images, many embedded videos, and external links to reference articles on my online site. Separately, there are approximately three hours of tutorial video with audio.
Bonus 3D files (in .lxo format)
As always, I include some files for you to explore and have fun with. Included here are:
- The complete, final landing gear rig from the F-22 project, so you can see how it all works
- A demo file illustrating how MODO's "Grow Curves" function can be useful in simulations
- An animated file featuring three copies of my "personal UCAV", with each one following different paths and timings. (You can see the original article here.)
- A Volvo 7700 Hybrid bus model I built for a customer who was in a big hurry. Studying this file shows the differences in quality you achieve by using shortcuts, compared to the more modern methods used on the Piaggio P180 and F-22. (exterior only)
Thank you!
- Mike James